PRODUCT LINKS BELOW CONTAIN COMPENSATED AFFILIATE LINKS AT NO COST
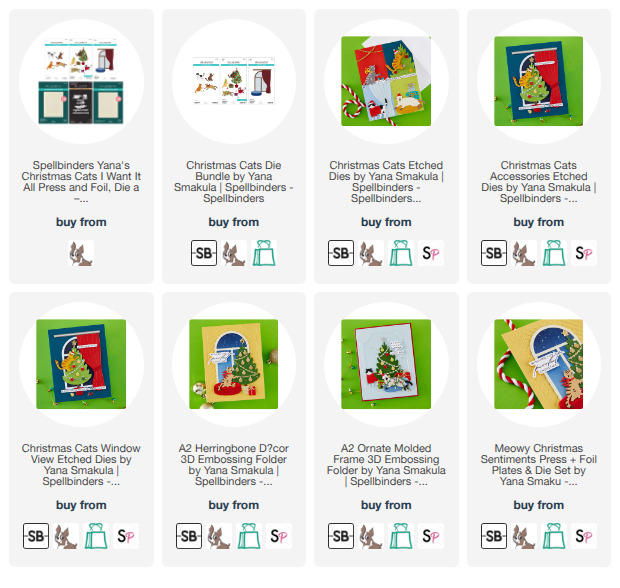
Hello Friends! Today I'm sharing a trio of playful Christmas cards featuring Spellbinders NEW Yana's Christmas Cats Collection by Yana Smakula. Yana created this collection in honor of her playful and mischief kitties. You can find the full collection HERE or the direct links below.
Card #1 - Have A Merry Furry Christmas
Featuring: Christmas Cats (S4-1546), Christmas Cats Accessories (S4-1547), A2 Ornate Molded Frame 3D Embossing Folder (E3D-179) and a sentiment from a previous released stamp set called Cats and Pugs Sentiments (STP-232).

Card Measurements:
White A2 Top Fold Card Base: 4 1/4" x 5 1/5" (4 1/4" x 11", scored at 5 1/2")
Seaside Embossed Panel: 4 1/8" x 5 3/8"
Black Sentiment Strip: 2 15/16" x 3/8"
Card #2 - You Are My Favorite Human
Have A Merry Furry Christmas
Featuring: Christmas Cats (S4-1546), Christmas Cats Accessories (S4-1547), A2 Herringbone Decor 3D Embossing Folder (E3D-183) and a sentiment from a previous released stamp set called Cats and Pugs Sentiments (STP-232).

Card Measurements:
White A2 Top Fold Card Base: 4 1/4" x 5 1/2" (4 1/4" x 11", scored at 5 1/2")
White A2 Top Fold Card Base: 4 1/4" x 5 1/2" (4 1/4" x 11", scored at 5 1/2")
Forest Embossed Panel*: 4 1/8" x 5 3/8"
Black Sentiment Strips: 2 5/8" x 3/8", 2 3/4" x 3/8"
*Spellbinders Forest Color Essential Card Stock (Retired)
Card #3 - Have A Merry Furry Christmas
Featuring: Christmas Cats (S4-1546), Christmas Cats Accessories (S4-1547), A2 Ornate Molded Frame 3D Embossing Folder (E3D-179) and a sentiment from a previous released stamp set called Cats and Pugs Sentiments (STP-232).

Card Measurements:
White A2 Top Fold Card Base: 4 1/4" x 5 1/5" (4 1/4" x 11", scored at 5 1/2")
Poppy Embossed Panel: 4 1/8" x 5 3/8"
Black Sentiment Strip: 2 7/8" x 3/8"

Compensated
affiliate links used when available. If you place an order after
clicking on one of my links, I will receive a small commission at no
cost to you. Make sure to accept cookies. Thank you for your support!
 Spellbinders
Yana's Christmas Cats Collection
Compensated
affiliate links used when available. If you place an order after
clicking on one of my links, I will receive a small commission at no
cost to you. Make sure to accept cookies. Thank you for your support!
Happy Stamping!!


.jpg)
.jpg)